Using AI to bootstrap
The fastest way to start a new Orchesty integration is to let an AI agent scaffold it for you. Orchesty ships two things that make this work as a single copy-paste:
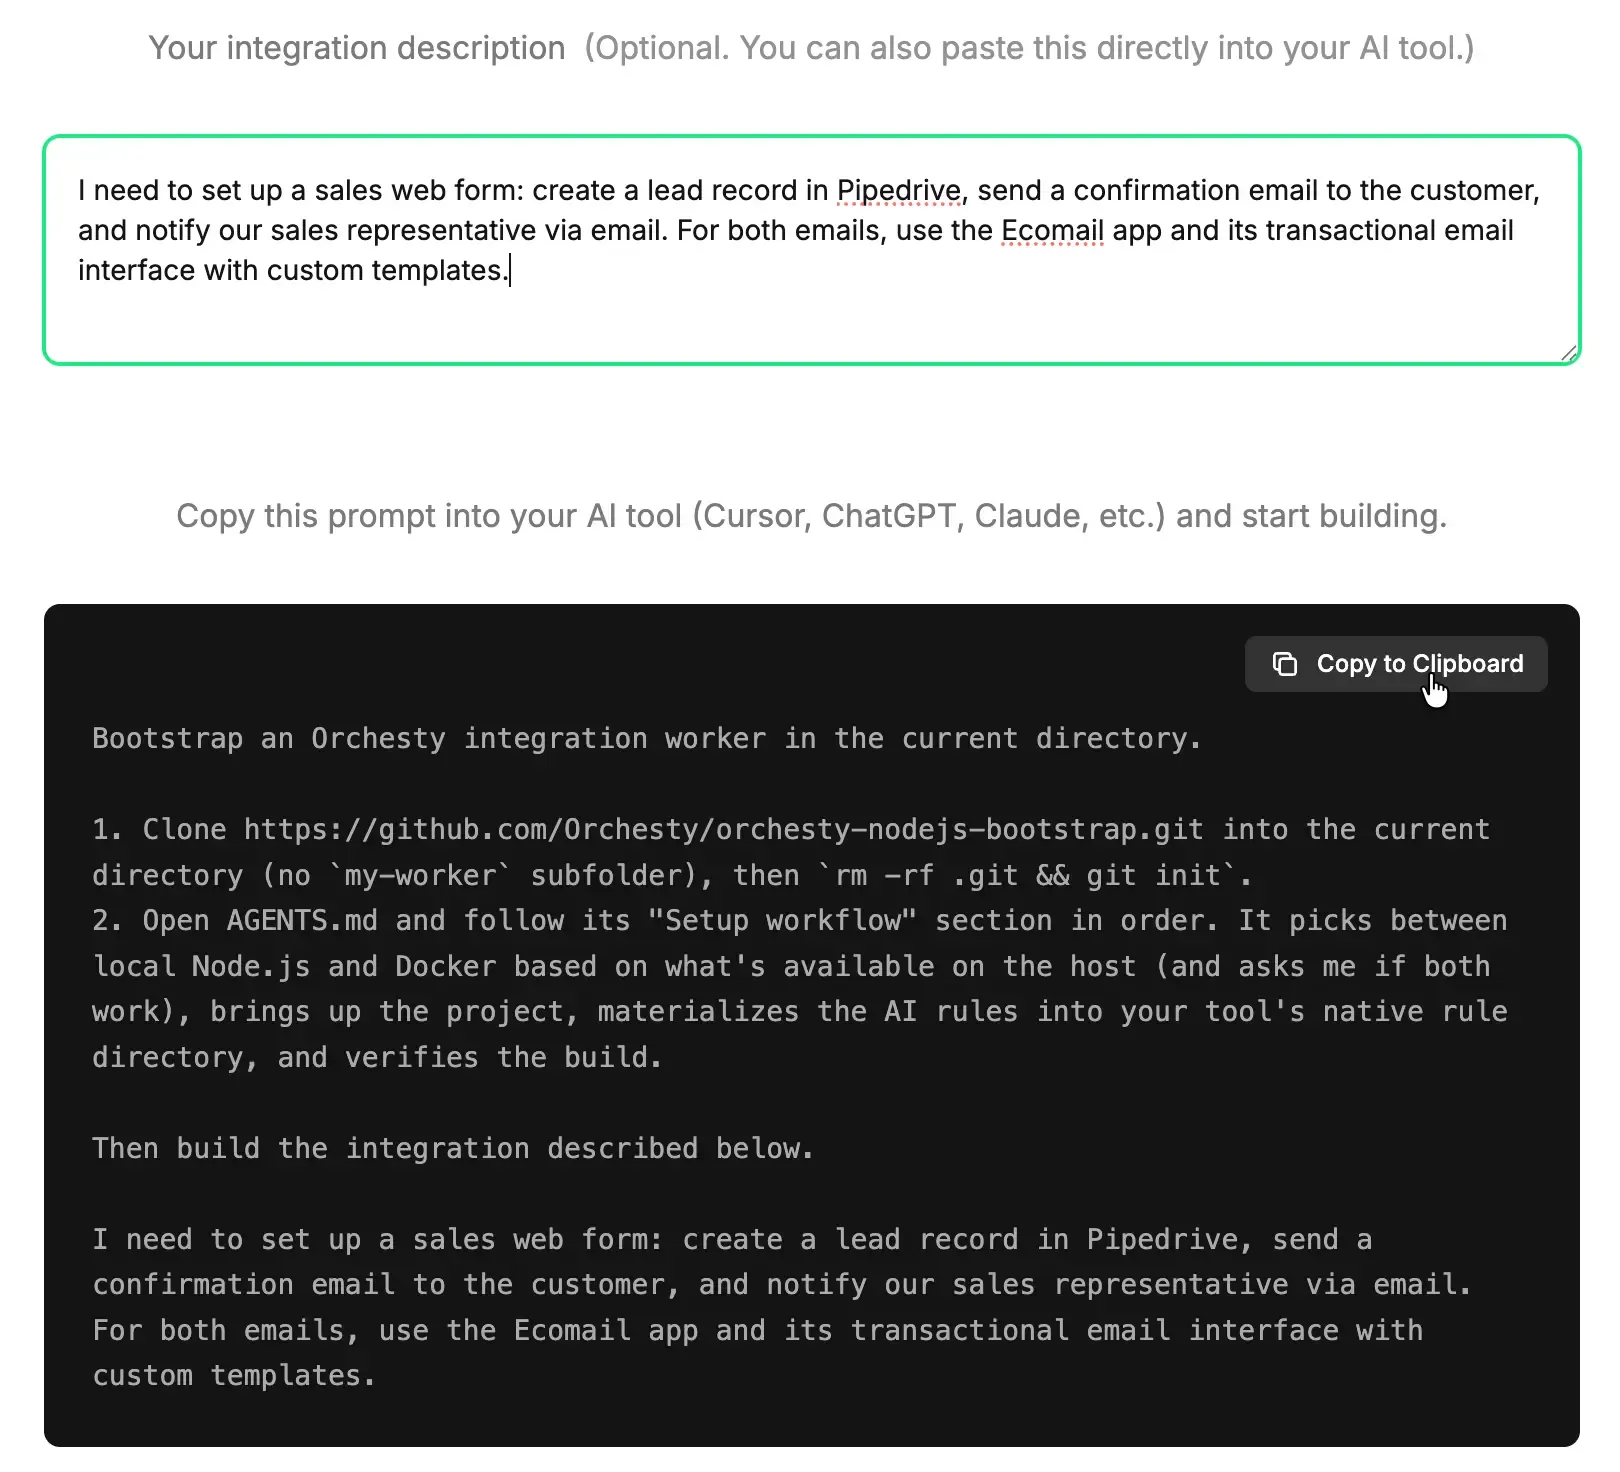
- A bootstrap prompt generated on the AI Bootstrap page.
- The
orchesty-nodejs-bootstraptemplate, which depends on the@orchesty/nodejs-airules package and includes anAGENTS.mdfile that tells any AI agent how to wire those rules into your editor's native rule format.
You don't have to read either of them. You don't have to copy rules around per editor. The agent does it.
Quick start in an empty folder #
- Open the AI Bootstrap page.
- Optionally describe the integration you want to build in the prompt input.
- Click Copy to Clipboard.
- Open an empty folder in your AI editor (Cursor, Claude Code, Windsurf, GitHub Copilot, Cline, Aider, ...) and paste the prompt into the chat.
The agent will then, on its own:
- Clone
orchesty-nodejs-bootstrapinto the current directory and reinitialise git. - Run
make init-dev(ormake installas a fallback) — auto-generates.envfrom.env.dist, installs dependencies including@orchesty/nodejs-ai, and starts the dev server. - Read
AGENTS.mdand materialise the rule pack into your editor's native location via the per-tool snippets innode_modules/@orchesty/nodejs-ai/AI-INSTRUCTIONS.md(.cursor/rules/,CLAUDE.md,.windsurfrules,.github/copilot-instructions.md,.clinerules/,.aider.conf.yml, ...). - Run
make testto verify lint + unit tests pass. - Start writing the integration you described, following the Orchesty conventions baked into the rules.
You review the diff and ship it.
Quick start inside the full-stack skeleton #
The full-stack orchesty-skeleton brings up the entire Community Edition stack (Admin UI, backend, MongoDB, RabbitMQ, supporting services) plus a Node.js worker container, all wired by docker compose. It ships its own root AGENTS.md plus the @orchesty/nodejs-ai dev dependency inside worker/, so the AI flow is essentially the same — just with a different prompt that targets the skeleton repo and the stack-wide make init-dev.
Use the dedicated spin-up prompt from the Community Edition page (the "AI prompt" tab in the Spin up Orchesty in minutes section). The agent will:
- Clone
orchesty-skeletoninto the current directory and reinitialise git. - Read the root
AGENTS.md, check Docker is available, runmake init-dev(renders.env, brings up the stack, registers the worker, installs topology), and verifyhttp://127.0.0.1is reachable. - Materialise the AI rules from
worker/node_modules/@orchesty/nodejs-ai/into your editor's native rule directory using the per-tool snippets inworker/node_modules/@orchesty/nodejs-ai/AI-INSTRUCTIONS.md(paths in that file are relative to the worker root, so the agent prefixes them withworker/).
Once the stack is up, integration code goes into worker/src/ exactly like in the slim worker template — the same conventions and the same rule pack apply.
What's in the rule pack #
The pack ships as the @orchesty/nodejs-ai package — files live at node_modules/@orchesty/nodejs-ai/rules/:
| File | Purpose |
|---|---|
orchesty-project.mdc | Architecture, component registration, payload flow |
orchesty-naming.mdc | Naming conventions and folder structure |
orchesty-connectors.mdc | Connector, batch, and custom-node patterns |
orchesty-applications.mdc | Authentication providers (Basic, OAuth2) |
orchesty-testing.mdc | NodeTester, mock fixtures, test layout |
orchesty-topologies.mdc | Topology JSON file format |
Every file uses the standard .mdc rule format with YAML frontmatter (alwaysApply, globs, description). The per-editor wiring step (handled automatically by the agent via AGENTS.md + node_modules/@orchesty/nodejs-ai/AI-INSTRUCTIONS.md) translates this format into whatever your editor expects.
If your editor is not covered by AI-INSTRUCTIONS.md, the fallback rule is: read every file in node_modules/@orchesty/nodejs-ai/rules/ at the start of each session and treat the contents as mandatory coding rules.
A useful first prompt #
The bootstrap prompt is generic. Once the agent finishes setup, give it something concrete:
Add an OAuth2 application called
Hubspotthat fetches contacts. Create a batch nodeHubspotListContactsthat pages through/crm/v3/objects/contactsand a custom nodeMapHubspotContactthat maps the response into{ email, firstName, lastName }. Register everything insrc/index.tsand write a basic NodeTester test for the batch.
The rule pack tells the agent which classes to extend, where to put files, what to name them, how to wire authentication, and how to write tests.
Customising the rules #
The rule files are plain Markdown. Copy them out of node_modules/@orchesty/nodejs-ai/rules/ into your repo (e.g. into .cursor/rules/), tweak the conventions to match your house style, and your agent immediately follows the new rules. Project-level rules win over the defaults shipped by the package.
Updating the rule pack #
When @orchesty/nodejs-ai ships a new version, refresh both the install and the materialised copy in your editor:
pnpm update @orchesty/nodejs-ai
# Then re-run the per-editor copy/concat snippet from
# node_modules/@orchesty/nodejs-ai/AI-INSTRUCTIONS.md
What's next #
- Open the Admin UI and try the scaffolded code with Your first custom node.
- Read Concepts to understand what the agent is generating, especially Connectors and Applications.
- Browse the Reference section for the exact class signatures the agent is calling.